Elevate Your LEGO Tree House: A Complete Guide to the 21318 Lighting Kit

The LEGO Ideas Tree House (21318) is more than just a toy; it’s a masterpiece of design and imagination. With its intricate cabins, interchangeable leaves for seasonal changes, and charming details, it captures the hearts of builders worldwide. But what if you could take this incredible set and elevate it to a whole new level? Imagine its cozy cabins glowing with a warm light at dusk and its leafy canopy twinkling under a starry night. This is where a custom lighting kit comes in, transforming your build from a static model into a living, breathing spectacle. At modelbuilder, we believe every amazing creation deserves to shine, and that’s exactly what a light kit does.
Whether you call it by its English name or search for the popular European term, the LEGO Boomhut 21318 verlichtingset is the key to unlocking the full potential of this iconic set. This guide will walk you through everything you need to know, from the magic it adds to the simple installation process, ensuring your LEGO Tree House becomes the stunning centerpiece it was always meant to be.
Why Illuminate Your LEGO Masterpiece?
Adding lights to a LEGO set is like an artist adding the final, perfect brushstroke. It’s a transformative experience that changes how you see and appreciate your creation. For the LEGO Tree House, this effect is particularly magical. The lights breathe life into the scene, creating an ambiance of warmth and nostalgia that a standard build simply can’t replicate.
Highlighting Intricate Details
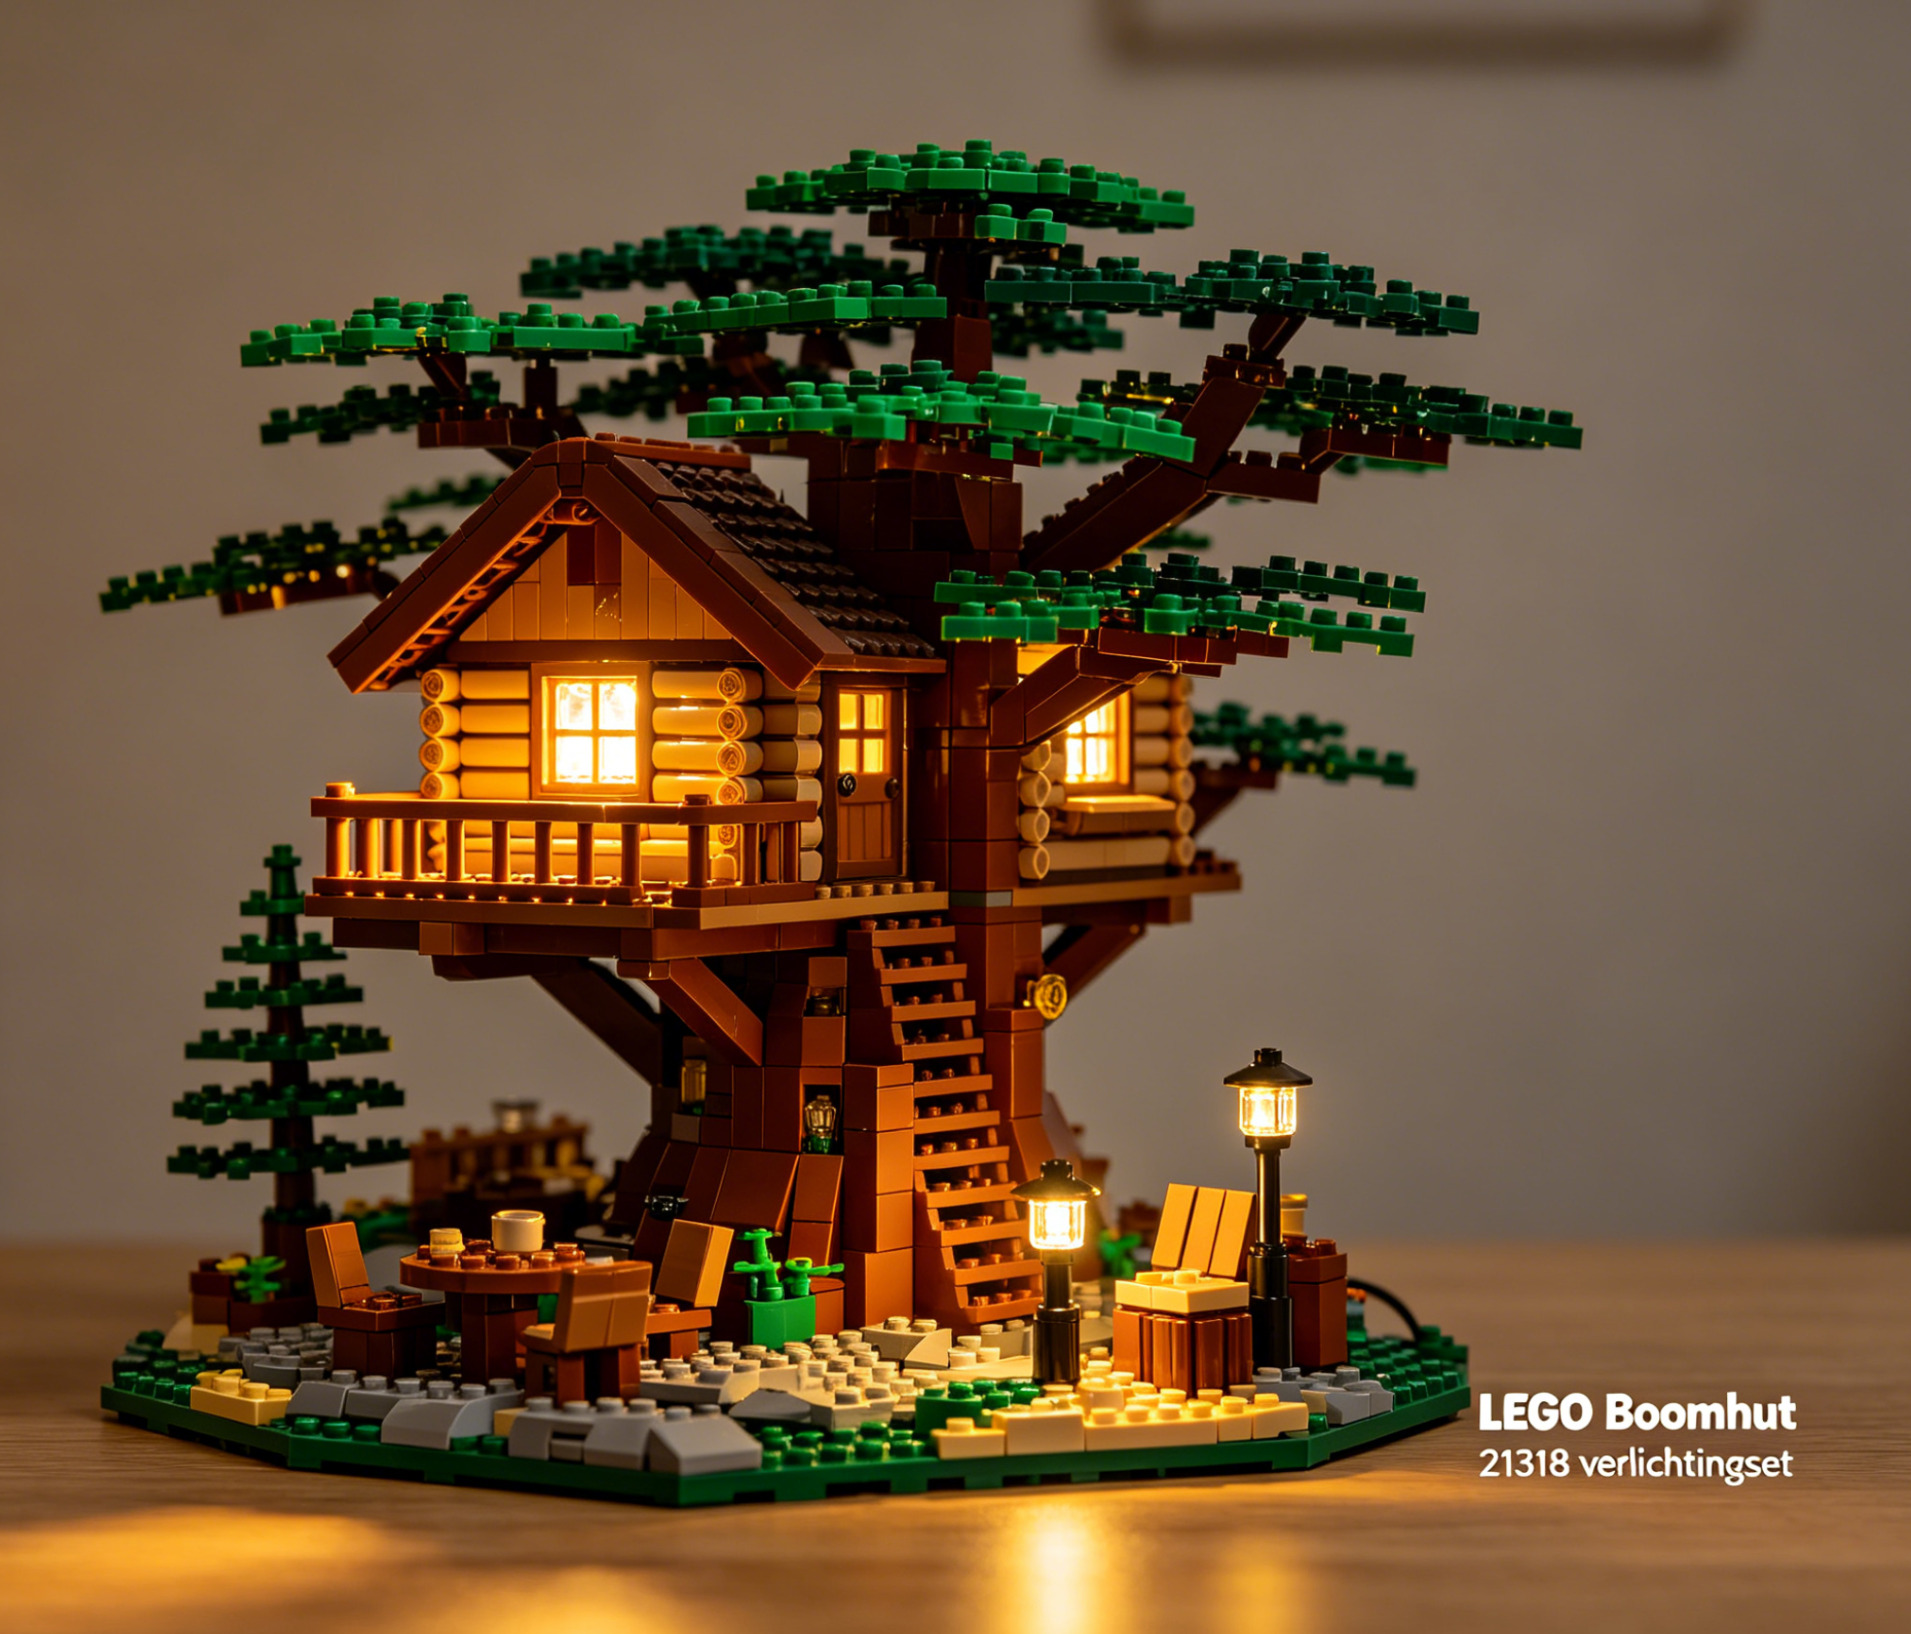
The LEGO 21318 set is packed with wonderful details: tiny bedrooms, a bathroom, a telescope on the balcony, and a winding staircase. During the day, these features are charming, but in low light, they can get lost. A lighting kit strategically illuminates each cabin and walkway, drawing the eye to the incredible craftsmanship you spent hours putting together. Suddenly, the interior of each room is visible, telling its own little story.
Creating a Stunning Display Piece
Let’s be honest: after you complete a 3,036-piece set, you want to show it off. A lit-up Tree House is no longer just a model on a shelf—it’s a piece of art. It becomes a conversation starter, a focal point in any room, and a source of constant wonder. Whether it’s glowing softly on your desk or taking pride of place in a display cabinet, the illuminated set exudes a professional and captivating quality that will impress anyone who sees it.
Unboxing and Understanding Your Lighting Kit
Opening your lighting kit for the first time is an exciting moment. While it might seem like a tangle of wires and tiny bulbs, these kits are ingeniously designed for simplicity and effect. A high-quality kit, like the ones celebrated by enthusiasts, will contain everything you need for a seamless installation.
Inside the box, you’ll typically find:
- LED Light Strips and Bit Lights: These are the tiny, powerful lights that will illuminate different areas of your Tree House.
- Expansion Boards: Small circuit boards that allow you to connect multiple lights neatly and manage the wiring.
- Connecting Cables: Ultra-thin, durable wires designed to fit between LEGO bricks without affecting the build’s integrity.
- Power Source: Usually a choice between a battery pack (typically for AA or AAA batteries) and a USB power cable for continuous power.
- Adhesive Squares: For mounting lights and boards securely in place.
- Instruction Manual: A step-by-step, illustrated guide that makes the process clear and straightforward.
The key to a great kit is the quality of its components. The wires should be thin enough to be hidden easily, and the LEDs should provide a consistent, warm glow that enhances the set’s natural charm rather than overpowering it. For a premium experience, exploring a dedicated LEGO Boomhut 21318 verlichtingset is the best way to ensure you get components designed specifically for your model.
A Step-by-Step Guide to Installation
Installing a lighting kit is a fun project in itself. It’s a careful, meditative process that allows you to revisit your build and appreciate it in a new way. While you should always follow the specific instructions included with your kit, here is a general overview of how the magic happens.
Step 1: Preparation
Before you begin, lay out all your components and familiarize yourself with the instruction manual. It’s often helpful to partially disassemble certain sections of your Tree House as indicated in the guide. This makes routing the wires much easier. Work in a well-lit area with plenty of space to avoid losing any tiny pieces.
Step 2: Lighting the Cabins
The journey usually starts with the three main cabins. You will carefully thread bit lights through the structures to illuminate the interiors. The wires are designed to run underneath bricks and plates, making them virtually invisible once the sections are reassembled. The goal is to make it look as if the light is naturally emanating from lamps and windows built into the set.
Step 3: Illuminating the Exterior and Foliage
This is where the Tree House truly comes to life. The kit will include lights for the staircase, the campfire at the base, and often a string of lights to wrap around the tree’s majestic branches. Hiding these wires requires a bit of patience, but the result is breathtaking. The gentle glow on the walkways and the twinkling lights in the leaves create a whimsical, fairy-tale atmosphere.
Step 4: Managing Wires and Connecting Power
As you install each light, you’ll connect them to the expansion boards, which are hidden away within the tree’s trunk or base. This keeps the wiring organized and out of sight. Once everything is connected, you’ll run a final cable to your chosen power source—either the battery pack or the USB cable. With a final check, you can flip the switch and watch your creation transform.
This careful design is what makes a custom LEGO Boomhut 21318 verlichtingset so special. It’s engineered to integrate perfectly with the original LEGO design. The team at modelbuilder ensures that their solutions are both beautiful and builder-friendly, respecting the integrity of the original set.
Tips for the Perfect Display
Once your Tree House is fully illuminated, it’s time to give it the spotlight it deserves. To maximize its visual impact, consider placing it in a location with controlled ambient light, such as a display case or a dedicated shelf. This will allow the custom lighting to truly pop, especially in the evening.
For a clean, professional look, take extra care with cable management. Tuck any excess wire length into the model’s structure. Using the USB power option is often ideal for a permanent display, as it eliminates the need to change batteries. You can connect it to a smart plug to turn your display on and off with a voice command or a timer, adding another layer of magic to the experience. If you are looking for other lighting kits to complement your Tree House, you can find a wide variety in the LEGO Boomhut 21318 verlichtingset collection and beyond.
Conclusion
The LEGO Ideas Tree House 21318 is an exceptional set on its own, but with the addition of a custom light kit, it becomes an extraordinary work of art. The warm, inviting glow brings out the set’s intricate details and creates an unparalleled display piece that will capture the imagination of everyone who sees it. The installation is a rewarding project that adds a new dimension to your LEGO hobby. By choosing a high-quality LEGO Boomhut 21318 verlichtingset from a trusted provider like modelbuilder, you ensure a seamless experience and a stunning final result that will bring you joy for years to come.
Frequently Asked Questions (FAQ)
Is this LEGO lighting kit difficult to install?
Not at all! These kits are designed to be user-friendly, even for those new to LEGO lighting. They come with detailed, step-by-step instructions. The components are plug-and-play, meaning no soldering or electronics knowledge is required.
How is the LEGO Tree House light kit powered?
Most kits offer flexible power options. They typically include a battery box (requiring AA or AAA batteries) and a USB connector. This allows you to power your display via a power bank, a computer’s USB port, or a wall adapter, giving you plenty of choices for your display setup.
Will installing the lights damage my LEGO bricks?
No, the installation is completely non-destructive. The wires are incredibly thin and designed to fit between and under LEGO studs and bricks without causing any stress or damage. You can easily remove the entire lighting kit later without leaving any trace on your set.